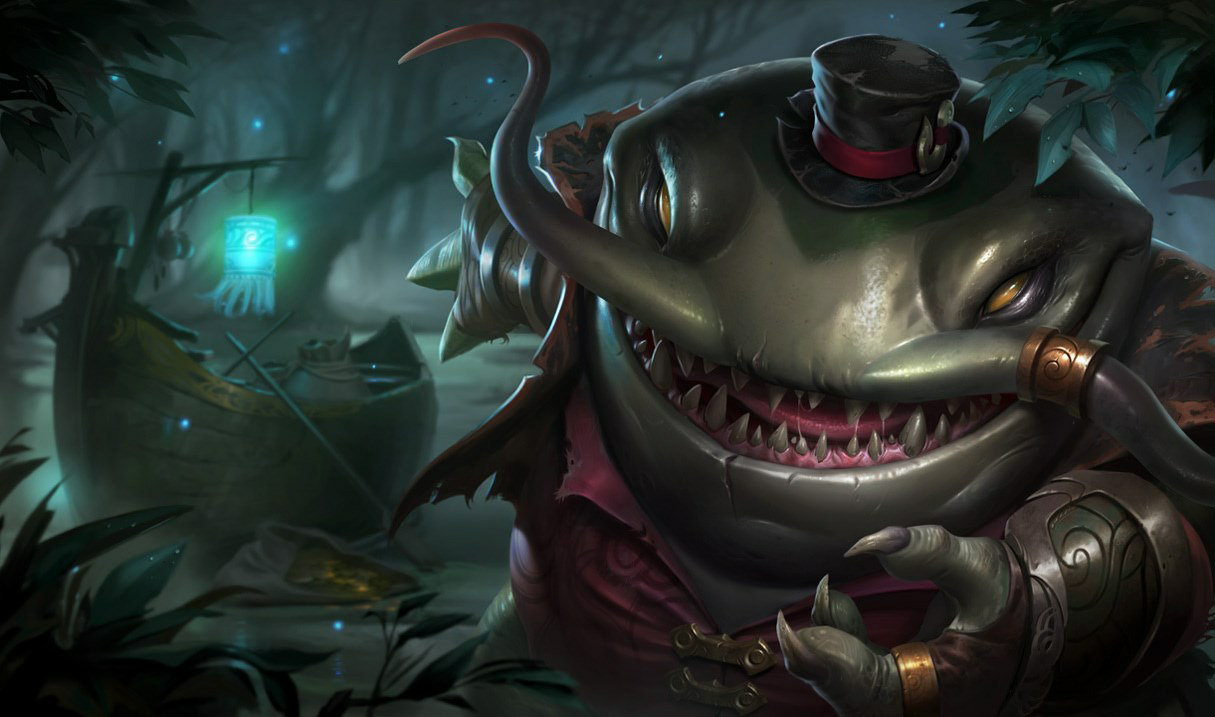
Tahm Kench is the ultimate bodyguard and lane bully. His Q stacks into enemy devour CC, his W shields and repositions allies, and his massive HP makes him extraordinarily tanky. He wins almost every 2v2 in lane through sustained trading.
Abilities
Skills Overview
P

An Acquired Taste
Passive
Tahm Kench puts the heft of his immense body behind his attacks, gaining extra damage based on his total health. Damaging enemy champions builds stacks of An Acquired Taste. At three stacks, he can use Devour on an enemy champion.
Acquired Taste: 3 stacks on an enemy allows W to devour them. Auto + Q + Q = 3 stacks for devour lockdown.
Q

Tongue Lash
Skillshot · Slow · Stack
Tahm Kench lashes out with his tongue, damaging and slowing the first unit hit and healing himself if he strikes an enemy champion.Applies a stack of An Acquired Taste to enemy champions. If the champion already has 3 stacks of An Acquired Taste, they are stunned and the stacks are consumed.
CD: 7/6.5/6/5.5/5 · Cost: 50/46/42/38/34
Q slows enemies and applies 1 Acquired Taste stack. Each Q on the same target adds a stack. 3 stacks = devourable.
W

Abyssal Dive
Devour · Shield · Regurgitate
Dive down and then re-appear at target location, damaging and knocking up all enemies in an area.
CD: 21/20/19/18/17 · Cost: 60/75/90/105/120
W on an ally shields them inside your belly and repositions them. W on a 3-stack enemy devours them as hard CC. Know when to use each.
E

Thick Skin
Shield · HP Cost
Passive: Tahm Kench stores a percent of the damage he takes and heals based on it while out of combat.Active: Convert all stored damage into a temporary shield.
CD: 3 · Cost: 0
E costs HP to activate but provides a damage shield. In losing fights, E burns your own HP — use it only in fights you intend to win.
R

Devour
Teleport · Engage/Escape
Tahm Kench devours a champion for a few seconds, dealing magic damage if they are an enemy, or shielding them if they are an ally.
CD: 0 · Cost: 100
R teleports you and a devoured ally to a target location. Use it to reposition your carry to safety or surprise engage from fog of war.
Skill Leveling Order — Max Q first, then E, then W · R at 6 / 11 / 16
| Level | Q | W | E | R | Note |
|---|---|---|---|---|---|
| 1 | Q — slow and stack builder | ||||
| 2 | W — devour available | ||||
| 3 | E — shield online | ||||
| 4 | Level Q | ||||
| 5 | Level Q | ||||
| 6 | R — Devour teleport unlocked | ||||
| 7 | Level Q | ||||
| 8 | Level E | ||||
| 9 | Q maxed ✓ | ||||
| 10 | Level E | ||||
| 11 | R rank 2 | ||||
| 12 | Level E | ||||
| 13 | E maxed ✓ | ||||
| 14 | Start leveling W | ||||
| 15 | Level W | ||||
| 16 | R rank 3 | ||||
| 17 | Level W | ||||
| 18 | W maxed ✓ |
Itemization
Recommended Builds
Summoner Spells
Primary
Flash
Best repositioning tool — engage, escape and combo extension
Secondary
Ignite
Kill pressure and Grievous Wounds to deny enemy healing
Situational
 Exhaust
Starter Items

Targon's Buckler
Melee gold income — you're always within devour and Q range.
400g

Refillable Potion
Sustain through the laning phase trading pattern.
150g
Core Build

Plated Steelcaps
Armor reduction and auto-attack damage reduction — essential vs ADC-heavy comps.
1100g

Warmog's Armor
Massive HP for W devour shield scaling — larger HP = larger devour shield.
3000g

Locket of the Iron Solari
Team shield for engage situations — activate before a fight.
2200g

Frozen Heart
Attack speed slow + armor — cripples auto-attackers who fight you.
2500g
Situational

Thornmail
Grievous wounds and armor — essential vs healing-heavy comps.
2700g

Fimbulwinter
Slows on Q enhance your stack-building into devour combos.
2600g

Heartsteel
HP scaling — massive HP pool amplifies your W devour shield proportionally.
3000g
Tahm Kench's W devour shield scales with max HP. More HP = more devour shield. Warmog's and Heartsteel are core to this. Build HP as much as possible.
AP Core

Rylai's Crystal Scepter
Q slow is permanent with Rylai — enemies can never walk away from your stacks.
2600g

Liandry's Torment
Burn damage on Q slow targets — persistent damage that kills tanks.
3000g

Ionian Boots of Lucidity
CDR for more Q casts and faster devour cooldowns.
950g
Warmog's Armor
HP for survivability even in the AP build.
3000g
AP Tahm is a niche but viable threat — Q with Liandry's + Rylai's creates permanent slow damage zones. Only use when team already has enough peel.
Runes
Resolve Primary

Guardian
Shield for you and your ADC when near each other — perfect for the bodyguard playstyle.

Font of Life
Q slow marks enemies — allies heal when attacking slowed targets.

Bone Plating
Reduces burst damage from all-ins — you absorb punishment so your ADC doesn't.

Unflinching
Tenacity when low HP — complete your Q stack into devour chain even when CC'd.
Inspiration Secondary

Magical Footwear
Free boots at 12 minutes — saves gold for HP items.

Cosmic Insight
Item and summoner CDR — more frequent Locket and W devour casts.
Shards
Ability Haste · Armor · Health
Gameplay
How to Play Tahm Kench
01
Early Game
Stack Q, Bully Lane, Devour Enemies
- Auto → Q → Q applies 3 Acquired Taste stacks for enemy devour — the sequence is fast enough to prevent escape.
- Your E shield burns your own HP — only activate it in fights you're winning. Don't E in losing trades.
- W your ADC out of Blitzcrank hooks and Nautilus chains instantly — devour negates the CC entirely.
- You win virtually every extended 2v2 — your HP pool and Q slow make trades heavily in your favor.
- Level 6 R lets you reposition your devoured ally to safety across the map — a free escape from any gank.
02
Mid Game
Bodyguard Your ADC Through Fights
- Use W ally devour to reposition your ADC during tower dives — eat them and spit them to safety.
- R with your ADC devoured can surprise engage from fog of war — teleport into their backline.
- Your sustained tankiness makes you the best engage peel support — absorb damage and Q slow divers.
- Coordinate with your ADC — they need to know when you'll devour them so they don't panic.
- Dragon fights: Q slow the enemy frontline repeatedly to build stacks, then devour their engage support.
03
Late Game
Unkillable Frontline with Devour Saves
- W ally devour during teamfights saves your ADC from any burst combo — it's a better Zhonya's.
- R repositions after eating your ADC — use it to move them from their frontline position to safety.
- Your Q slow is permanent pressure — enemies can't reposition without being slowed and stack-built.
- Heartsteel + Warmog's HP scales your devour shield to enormous amounts — your ADC inside W is nearly invulnerable.
- You counter all assassins — Zed, Talon, Fizz cannot kill your ADC while they're inside your belly.
Teamfighting
How to Teamfight as Tahm Kench
Tahm Kench teamfights by absorbing damage, CC-ing enemies with devoured stacks, and saving his ADC from lethal situations with W ally devour. He is the best anti-assassin tool in the support role.
1
Pre-Fight — Stack Carries for Devour
Before engage
01
Stack Q on their carry before the fight — 3 stacks means you can devour them mid-fight.
02
Activate Locket as your team engages — team shield during the engagement window.
03
Position next to your ADC — you need to be within W range to save them.
Do NOT devour your ADC unless they're about to take lethal damage. Devouring your ADC mid-fight when they're at 50% HP removes their damage from the fight unnecessarily.
2
Fight — Q Slow, W Save, Devour Enemy
Fight opening
01
Q their frontline repeatedly — slow them and build stacks for potential devour CC.
02
W your ADC instantly if they're about to take lethal damage from an assassin.
03
Devour 3-stack enemy if you see an opportunity — swallow their engage support or fed carry.
04
E to absorb damage — activate when being focused heavily.
3
Aftermath — Spit and Chase
Mid-fight
01
Spit devoured enemy into your team for follow-up damage after W CC duration.
02
R to reposition devoured ADC to safety if the fight turned bad.
03
Q slow retreating enemies — keep your team's chase alive.
Devour an enemy near a wall and spit them INTO the wall — they're knocked up against it. This stacks additional CC on top of the devour lockdown for extended crowd control.
Video Guide
Watch the Full Guide

Credits to Joeyyylol
Tips & Tricks
Advanced Mechanics & Hidden Tech
Advanced mechanics for Tahm Kench.
Basic
Stack for Enemy Devour
Auto attack → Q → Q applies 3 Acquired Taste stacks for enemy devour. Practice this sequence in training mode — it's fast and can be done on any enemy in range.
Basic
W Save Timing
W ally devour the moment you see Zed's R land, Talon jump, or Fizz pole vault. The devour negates all damage during the animation — your ADC takes zero damage while inside.
Intermediate
R Repositioning
You can R while an ally is devoured inside you. Use this to: (1) teleport them away from danger, (2) surprise engage by appearing from fog of war, or (3) bodyblock turret shots.
Intermediate
E HP Cost Trade-Off
E costs your own HP to activate the shield. In a fight you're clearly winning, E is free HP. In a fight you're losing, E drains you faster. Only activate E when you intend to win the trade.
Intermediate
Devour Wall Bounce
Spit a devoured enemy into a wall for an additional knockup on top of the devour CC. This creates extended crowd control — always try to spit toward a wall.
Advanced
Anticipate Assassin Dashes
W your ADC BEFORE Zed's R, LeBlanc's blink, or Fizz's pole land — not after. Watch the assassin's animation and devour 0.25 seconds before they'd hit your ADC.
Advanced
HP Scaling Build Optimization
Warmog's + Heartsteel + Frostfire gives you 8,000+ HP. At this HP level, your W devour shield is enormous — your ADC survives inside for almost indefinitely. Stack HP as your primary stat.
Basic
Communicate W Timing
Tell your ADC 'I will devour you when X happens.' ADCs who know W is coming don't panic — ADCs who don't know panic and Flash out of W range, wasting your save.
Matchups
Counters & Matchups
Tahm Kench struggles against poke damage he can't devour away, and supports who can CC him before he can W allies. He excels against assassins and dive compositions.
Click any matchup to expand tips & how to play against them
Loses Against

Xerath pokes from outside your Q range and E. You cannot reach him to stack Acquired Taste and his sustained damage drains HP faster than your E shield regenerates.
Rush into range as fast as possible using R. If you can't engage, stay behind minions and wait for mid-game grouping.

Brand's passive burn damage ignores your E shield's flat reduction and his W stun prevents you from W-protecting your ADC in time.
Dodge Brand's W stun — it's the only way to prevent the chain combo. Sidestep it and immediately Q stack him.

Lux root prevents you from reaching her ADC with W saves and keeps your ADC locked down for the full burst combo.
Block Lux Q with your body — absorb the root yourself so your ADC can move freely.
Wins Against
Zed's R is the most telegraphed assassination in the game. W your ADC the moment you see Zed's shadow R — they take no damage inside you.
Watch Zed's shadow position. The moment he R's, press W on your ADC immediately. Perfect timing negates his entire kit.

Fizz's pole vault is Tahm's favorite ability to counter — W devour your ADC the moment Fizz leaps toward them. Fizz deals zero damage to your devoured ADC.
W your ADC when you see Fizz's jump animation. They're safe inside and Fizz has no escape from your Q stack retaliation.

Soraka cannot stop your engage and your sustained trading beats her healing. Your Q stacks let you devour her before she can Q heal efficiently.
Chase Soraka aggressively. She has no CC to stop your Q stack into W devour combo.
Team Comp
Best Synergies

Tahm Kench's Devour saves Jinx from assassins who try to shut down her Get Excited snowball, letting her chain kills freely once protected.

Kog'Maw has zero self-peel and relies entirely on his support — Tahm Kench's Devour and massive HP pool make him nearly unkillable in the backline.

Tahm Kench's Q stacks into enemy Devour create lethal lane all-ins that Draven's early burst damage instantly converts into kills.

Samira needs a hard engage setup to start her combo — Tahm Kench's Devour CC and tongue lash stacking reliably locks enemies in place for her to chain abilities.