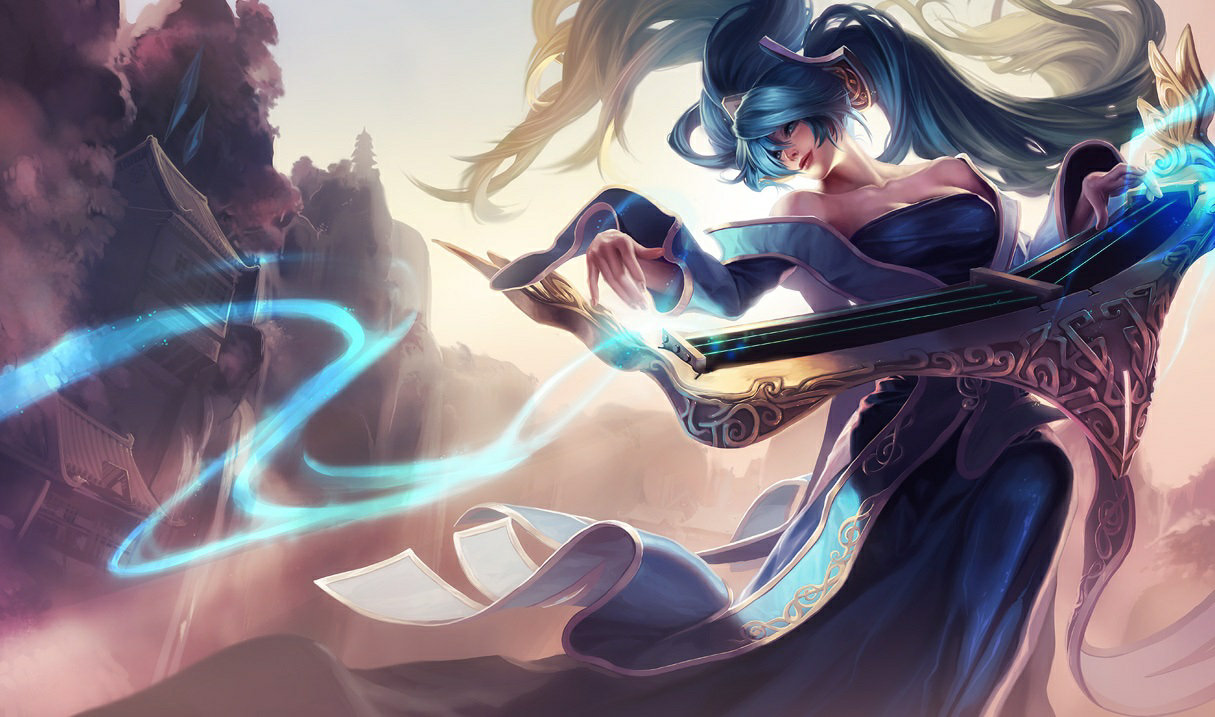
Sona is the quintessential enchanter support. She cycles Q poke, W heals, and E speed boosts while managing Power Chord empowered autos. Her R Crescendo stuns the entire enemy team with no aiming required — the easiest-to-land game-winning ultimate in the game.
Abilities
Skills Overview
P

Power Chord
Passive
Accelerando: Sona gains non-Ultimate ability haste permanently for her basic abilities as she uses her abilities well, up to a cap. Beyond that cap, further successful uses reduce her ultimate's remaining cooldown instead.Power Chord: Every few spell casts, Sona's next attack will deal bonus magic damage in addition to an additional effect based on what basic Ability Sona last activated.
Power Chord: 3rd ability gives an enhanced auto — Hymn of Valor (Q chord) deals bonus magic damage, Aria of Perseverance (W chord) reduces enemy damage, Song of Celerity (E chord) slows. Cycle Q → W → E for maximum utility.
Q

Hymn of Valor
AoE Poke · Empowered AA
Sona plays the Hymn of Valor, sends out bolts of sound, dealing magic damage to two nearby enemies, prioritizing champions and monsters. Sona gains a temporary aura that grants allies tagged by the zone bonus damage on their next attack against enemies.
CD: 8 · Cost: 50/55/60/65/70
Q deals AoE poke to targets in front of you. The empowered auto after 3 casts deals massive bonus damage. Use Q chord auto on carries, not tanks.
W

Aria of Perseverance
AoE Heal · Shield
Sona plays the Aria of Perseverance, sending out protective melodies, healing Sona and a nearby wounded ally. Sona gains a temporary aura that grants allies tagged by the zone a temporary shield.
CD: 10 · Cost: 80/85/90/95/100
W heals the two most wounded allies near you. Use it when your ADC drops to 70% HP. The W chord auto reduces enemy damage dealt.
E

Song of Celerity
Speed Boost · Empowered AA
Sona plays the Song of Celerity, granting nearby allies bonus Move Speed. Sona gains a temporary aura that grants allied champions tagged by the zone bonus Move Speed.
CD: 14 · Cost: 65
E speeds nearby allies. Use it to help your team flee, engage, or reposition. E chord auto slows the enemy.
R

Crescendo
AoE Stun · Dance
Sona plays her ultimate chord, stunning enemy champions and forcing them to dance and dealing magic damage to them.
CD: 140/120/100 · Cost: 100
R is not a skillshot — it's a point-blank AoE in front of you. Position yourself near multiple enemies before pressing R.
Skill Leveling Order — Max Q first, then W, then E · R at 6 / 11 / 16
| Level | Q | W | E | R | Note |
|---|---|---|---|---|---|
| 1 | Q — poke online at level 1 | ||||
| 2 | W — heal online | ||||
| 3 | E — speed boost for escapes | ||||
| 4 | Level Q | ||||
| 5 | Level Q | ||||
| 6 | R — Crescendo unlocked | ||||
| 7 | Level Q | ||||
| 8 | Level W | ||||
| 9 | Q maxed ✓ | ||||
| 10 | Level W | ||||
| 11 | R rank 2 | ||||
| 12 | Level W | ||||
| 13 | W maxed ✓ | ||||
| 14 | Start leveling E | ||||
| 15 | Level E | ||||
| 16 | R rank 3 | ||||
| 17 | Level E | ||||
| 18 | E maxed ✓ |
Itemization
Recommended Builds
Summoner Spells
Primary
Flash
Best repositioning tool — engage, escape and combo extension
Secondary
Exhaust
Reduce damage and slow to peel for your carries
Situational
 Ignite
Starter Items

Spellthief's Edge
Gold from Q poke procs — generates income safely from range.
400g

Refillable Potion
Mana and HP sustain during laning phase.
150g
Core Build

Ionian Boots of Lucidity
CDR for more Q pokes and W heals — Sona is highly CDR-dependent.
950g

Moonstone Renewer
W healing amplified by Moonstone — massive sustained AoE healing during teamfights.
2500g

Ardent Censer
Attack speed and on-hit buff for your ADC every W cast.
2300g

Redemption
AoE teamfight healing — combine with W and Moonstone for healing overload.
2300g
Situational

Staff of Flowing Water
AP buff on heal for AP carry teams.
2300g

Mikael's Blessing
Cleanse CC from your ADC — pair with Exhaust.
2300g

Locket of the Iron Solari
Shield for engage-heavy enemy compositions.
2200g
Moonstone + Ardent is the standard path. Every W cast heals and triggers both items simultaneously — your healing output in teamfights is unmatched.
AP Core

Luden's Tempest
Q poke with Luden's burst is enormous — oppressive harassment from range.
3200g
Ionian Boots of Lucidity
CDR for maximum Q spam.
950g

Liandry's Torment
Burn damage — great vs tanky comps who can't be burst.
3000g

Rabadon's Deathcap
Huge AP amplification — Sona Q becomes a nuke with Rabadon's.
3800g
AP Sona is powerful but risky — you sacrifice all healing for damage. Only build this when winning hard.
Runes
Sorcery Primary

Arcane Comet
Q poke triggers Comet — massive harassment damage in laning phase.

Manaflow Band
Mana sustain — Sona drains mana rapidly with constant ability cycling.

Transcendence
CDR at level 5 — more ability cycles means more Power Chord procs.

Scorch
Burn on Q poke — enemy HP steadily drops from your constant harassment.
Resolve Secondary

Font of Life
Q poke marks targets — allies heal when attacking those targets.

Revitalize
Increases W healing size — biggest impact rune for Sona's core identity.
Shards
Ability Haste · Armor · Health
Gameplay
How to Play Sona
01
Early Game
Q Poke and W Heal Cycle
- Cycle Q → W → E → Q to maintain Power Chord stacks and proc the enhanced auto at optimal times.
- Use Q chord auto on the enemy carry, W chord auto on the enemy tank to reduce their damage.
- W when your ADC drops below 65% HP — the double heal targets the two lowest HP allies.
- Stay behind your ADC and minions — Sona has no escape and is extremely squishy.
- Your E speed boost helps your ADC dodge skillshots — use it proactively when you see them wind up.
02
Mid Game
R into Dragon and Skirmishes
- R in the river at level 6 is a kill threat — ping your ADC to engage, then R the stun to follow up.
- Dragon fight R stuns their entire team — engage with your tank, then immediately R when they cluster.
- W heal keeps your ADC alive through dives — spam it on cooldown during fights.
- Buy Ardent Censer before going to Dragon — the attack speed buff on your ADC during the fight is free DPS.
- Position centrally in skirmishes so your W heals multiple allies simultaneously.
03
Late Game
Heal Your Way to Late-Game Dominance
- Your R is best used after your tank engages — wait for enemies to group, then R from behind your team.
- Moonstone + Ardent + Redemption + W is near-unlimited healing in extended teamfights.
- E speed boost on your team helps them chase or escape — use it reactively to the flow of the fight.
- You are fragile — always stand at the back of fights and let your frontline take hits.
- A well-timed Crescendo after a Malphite or Amumu R extends the stun chain for 4+ seconds of free damage.
Teamfighting
How to Teamfight as Sona
Sona teamfights with one goal: land R Crescendo on multiple enemies after your tank engages. Then heal your team through the fight with W on cooldown while cycling Power Chord for utility.
1
Pre-Fight — Stack W Chord
Before engage
01
Cycle to W Power Chord before the fight — the W chord auto reduces enemy damage dealt after your R stun.
02
Stay behind your team — your R is point-blank AoE, you need to be near enemies when you press it.
03
E speed boost your team's engage — activate E as your tank jumps in.
Do NOT use R before your tank engages. The R stun is wasted if enemies aren't committed to the fight. Wait for them to Flash in, then immediately R.
2
Engage — R Stun, W Heal
Fight opening
01
R immediately after tank engage — enemies group around the tankl, R stuns them all.
02
W chord auto on the carry — reduces their damage output during the stun window.
03
W on cooldown to AoE heal your team through the fight.
04
Activate Redemption if multiple allies are low HP.
3
Aftermath — Heal and Speed
Mid-fight
01
W continuously — your healing keeps your frontline alive in extended fights.
02
E to help your team chase kills or disengage from a bad fight.
03
Q chord auto on any isolated carry for bonus damage clean-up.
If the enemy team has Morgana, wait for Black Shield to expire before using R. An R blocked by Black Shield is wasted. Fake-engage once to bait the shield, then real-R when it's on cooldown.
Video Guide
Watch the Full Guide

Credits to i0ki
Tips & Tricks
Advanced Mechanics & Hidden Tech
Advanced mechanics for Sona.
Basic
Power Chord Cycling
Every 3 ability casts gives you an enhanced auto. Cycle Q → W → E for damage → damage reduction → slow. Or repeat Q → Q → Q for maximum damage output. Understand which chord you need before fights.
Basic
R is Point-Blank
R Crescendo affects enemies directly in front of and around Sona — it's not a skillshot. Position yourself near multiple enemies before pressing R. Walk into their group, then press R.
Intermediate
W Chord Anti-Damage
W Power Chord reduces enemy damage dealt by 25% for 3 seconds. Use it on the enemy carry right as they're about to blow their burst combo — their damage is significantly reduced.
Intermediate
E Dodge Tool
E speeds nearby allies. Use it reactively when you see the enemy wind up a skillshot — your ADC gets a short speed boost to dodge. Works especially well vs Blitzcrank hooks.
Intermediate
Aura Range Management
Sona's passive auras only activate for allies within 1100 units. Stay close to your ADC at all times — if you're too far away, they don't get the Q damage bonus or W heal.
Advanced
Flash R Engage
Flash into the enemy backline and immediately R. This stuns their carries from an unexpected angle — much harder to dodge than a frontline R. Save Flash specifically for this play.
Advanced
Mana Management
Sona drains mana extremely fast. Use Manaflow Band and Biscuits to sustain. In lane, only cast W when your ADC needs it — don't spam it for tiny heals. Sona players who go OOM lose games.
Basic
Q Aura Damage Bonus
After casting Q, your next 2 auto-attacks deal bonus magic damage (Hymn of Valor aura). Weave autos between Q casts to maximize your poke damage — Q → auto → auto → Q → auto.
Matchups
Counters & Matchups
Sona struggles against aggressive all-in supports who can reach and burst her. She excels against passive poke supports in teamfight compositions.
Click any matchup to expand tips & how to play against them
Loses Against

Pantheon's W stun into empowered Q kills Sona in one combo at most levels. She has no escape and his point-click stun bypasses her Q passive damage.
Never walk up to proc Spellthief's. Play at maximum Q range and retreat if Pantheon steps toward you.

Blitzcrank hook grabs Sona into his team and she dies immediately. She has zero escape tools and is the easiest hook target in the game.
Stay directly behind the biggest minion in the wave at all times. Never walk to the side or behind your ADC where hooks have clear vision.

Leona all-in at level 2 kills Sona before she can W heal through it. Her CC chain is longer than Sona's heal cycle.
Let your ADC kite and poke Leona. Play at maximum range and spam Q. If Leona E engages, Flash immediately.
Wins Against

Soraka's healing can't match Sona's poke damage. Your Q Comet pressure forces Soraka to constantly heal herself, reducing her ability to sustain her ADC.
Out-poke Soraka in laning. She runs out of mana before you do if you consistently Q harass her.

Yuumi attached to the ADC can't stop your Q poke on the ADC-Yuumi combo. Your W heals scale with your ADC's HP, which always exceeds Yuumi's healing.
Poke the ADC, not Yuumi. Every Q that hits the ADC deals damage that Yuumi must heal through.

Zilean's Q bomb damage matches your poke but his utility doesn't match your healing output. Your sustained healing outlasts his burst patterns.
Out-sustain Zilean's poke with W heals. His R is strong but one-time — your healing is continuous.
Team Comp
Best Synergies

Sona's sustained W healing and Ardent Censer attack speed buff let Kog'Maw fire his W bio-arcane barrage constantly, creating near-unkillable sustained DPS.
Malphite's R groups the entire enemy team, then Sona's Crescendo chains on top for 4+ seconds of combined stun — one of the easiest wombo combos in the game.

Sona's Ardent Censer attack speed buff and W heals allow Jinx to stay in range and auto-attack longer, maximizing her passive Get Excited proc chain.

Amumu's R holds enemies in place for Sona's Crescendo to follow up instantly, and Sona's E speed boost lets the entire team rush onto the stunned group.